【機械学習】MediapipeとLSTMを使った転倒検出
はじめに
本記事では、Googleが提供する機械学習ライブラリ「Mediapipe」を活用し、Pythonで転倒検出を行う方法を解説します。
Mediapipeの主な機能
MediapipeはGoogleが提供するオープンソースの機械学習ライブラリで、リアルタイムの画像処理や姿勢推定などを簡単に実装できるのが特徴です。
- Hand Tracking(手の動き検出)
- Face Mesh(顔のランドマーク検出)
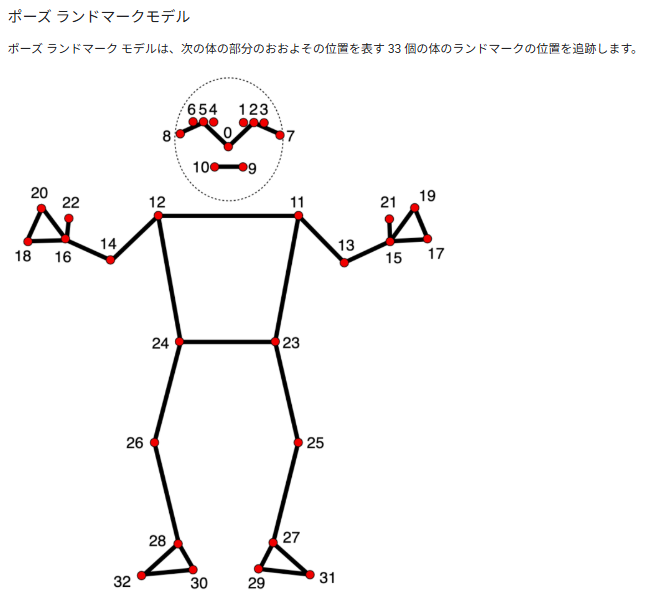
- Pose Estimation(姿勢推定)
今回は、Pose Estimationを活用して転倒検出を行います。

転倒検出の概要
MediapipeのPose Estimationを使用し、人の関節の位置を取得し、転倒したかどうかを判断するシステムを構築します。
仕組みの概要
- 転倒/歩行中が含まれるデータセットからMediapipeを使って骨格推定をし、キーポイントを取得する
- 取得した関節の座標データを転倒or歩行を判定するLSTMモデルに学習させる
今回は倒れる直前の姿勢を元にすぐに転倒を検出したかったので時系列モデルのLSTMを用いて前30フレームの姿勢推定のキーポイントからstandingとfallのアクションを学習させました。
処理の順番としては、
- トレーニングデータ、テストデータの準備(転倒、歩行動画を複数のjpg画像として保存)
- Mediapipeを使って画像から姿勢推定を行い、キーポイントのデータをnpyファイルで保存
- 保存したキーポイントのデータを使ってLSTMを学習させてモデルを保存
データセット
学習には2つのデータセットを使用しました。
・KFALL Dataset
https://sites.google.com/view/kfalldataset
・UR Fall Detection Dataset
https://fenix.ur.edu.pl/mkepski/ds/uf.html
姿勢推定
画像データから姿勢推定を行って学習データを作成するためのコードです(一部抜粋)
# 画像の読み込みとMediapipeによる姿勢推定、姿勢データの保存
sequence =0
action = actions
with mp_holistic.Holistic(min_detection_confidence=0.5, min_tracking_confidence=0.5) as holistic:
    for seq in seq_files:
        files=[]
        path = seq + '/*.png'

        for name in sorted(glob.glob(path)):
            files.append(name)
        # Read images with OpenCV.
        images = {name: cv2.imread(name) for name in files}
        frame_num=0

        for name, frame in enumerate(files):
        # Convert the BGR image to RGB and process it with MediaPipe Pose.
            image, results = mediapipe_detection(cv2.imread(frame), holistic)
            print(frame)
            # NEW Export keypoints
            keypoints = extract_keypoints(results)
            npy_path = os.path.join(DATA_PATH, action, str(sequence), str(frame_num))
            np.save(npy_path, keypoints)
            print(npy_path)
            frame_num +=1
        sequence +=1
LSTMの学習
LSTMモデルを定義して学習し、モデルを保存するコードです(一部抜粋)
# LSTMモデル定義
model = Sequential()
model.add(LSTM(64, return_sequences=True, activation='relu', input_shape=(30,1662)))
model.add(LSTM(128, return_sequences=True, activation='relu'))
model.add(LSTM(64, return_sequences=False, activation='relu'))
model.add(Dense(64, activation='relu'))
model.add(Dense(32, activation='relu'))
model.add(Dense(actions.shape[0], activation='softmax'))


# optimizer = adam_v2.Adam(lr=0.001)
model.compile(optimizer='Adam', loss='categorical_crossentropy', metrics=['categorical_accuracy'])

# 学習データ、テストデータに分割
X_train, X_test, y_train, y_test = train_test_split(X, y, train_size=0.9, shuffle=True)

# 学習スタート
model.fit(X_train, y_train, epochs=1000, callbacks=[tb_callback])
model.summary()

# モデルの保存
model.save('action.h5')
推論と動画保存
テストデータから姿勢推定と転倒検出をするコードです(一部抜粋)
# 推論
with mp_holistic.Holistic(min_detection_confidence=0.5, min_tracking_confidence=0.5) as holistic:

    for seq in seq_files:
        files=[]
        path = seq + '/*.png'
        # print('path!!!',path)

        for name in sorted(glob.glob(path)):
            files.append(name)
        # Read images with OpenCV.

        images = {name: cv2.imread(name) for name in files}
        frame_num=0

        for name, frame in enumerate(files):
        # Convert the BGR image to RGB and process it with MediaPipe Pose.
            image, results = mediapipe_detection(cv2.imread(frame), holistic)
            print(frame)

            # Draw landmarks
            draw_styled_landmarks(image, results)

            # 2. Prediction logic
            keypoints = extract_keypoints(results)
            sequence.append(keypoints)
            sequence = sequence[-30:]

            if len(sequence) == 30:
                res = model.predict(np.expand_dims(sequence, axis=0))[0]
                print(actions[np.argmax(res)])


            #3. Viz logic
                if res[np.argmax(res)] > threshold:
                    sentence = actions[np.argmax(res)]

            print(sentence)
            cv2.rectangle(image, (0,0), (150, 40), (245, 117, 16), -1)
            cv2.putText(image, str(sentence), (3,30),
                        cv2.FONT_HERSHEY_SIMPLEX, 1, (255, 255, 255), 2, cv2.LINE_AA)

            # # Show to screen
            savepath = result_PATH + str(frame_num).zfill(6) + '.jpg'
            cv2.imwrite(savepath, image)
            save.write(image)#保存

            frame_num +=1

save.release() GitHubのリンクはこちら